1 Take a square image and use one beautiful
color from Your image.
2 Join an edge of 5 pix fill it with Your
choosen color.
3 Join again an edge of 5 pix and fill it with a
gold patern.
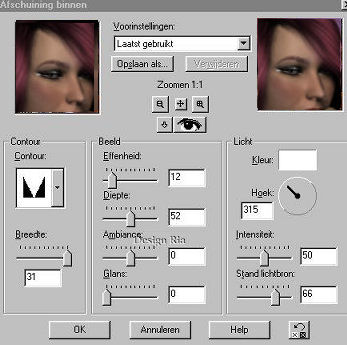
4 Effects – 3D effects – Inner bevel to within
as below.

5 Repeat point 2-3 and 4 only then with 8 pix
and also with 10 pix.
6 Selections – Everything select. Selections
– Change and shrink with 41 pix.
7 Selection turn
around.
8 Effects – Geometric effects – Perspective
horizontally on –30
9 Layers – Convert to raster layer and select
with your magic wand on 0 (with shift hold down) select the top
and bottom pieces.
10 Pressure on the Delete button and the pieces
are transparent.
11 Set Your background on end.
(Lock it)
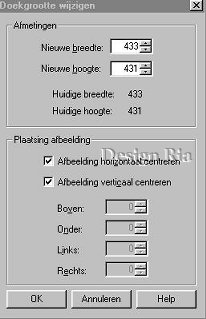
12 Image – Canvas size. Take 50 pix more than your
image, in the height and width.

13
Selections – Everything selected – Change and shrink to 15.
14
Selections – Turn around and fill with your gold patron.
15
De same inner bevel as by point 4
16
Undo Selection.
17
Go to Image – canvas size and make it 20 pix larger there by
both the two numbers.
18
Select this space and fill with Your color. Again the same inner
bevel (point 4)
19
Image – canvas size prevent 20 pix increase and fill with gold
patron and for the last one turn the inner bevel.
20
Put something of decoration in the edge only take care that you
remain frame within the most outside.
I
have token a long small decoration. Set there for instance 1 at
the top the middles copy and move that at the bottom of the
middle.
21
Set your background on lock and join the 2 lay together (care
well that the layer of the decoration has been selected) Layers
-
merge visible.
22
Edit-Copy - Edit – Paste as new layer.
23
Image - Rotate with 90 degree and put it on at the side .
24
Layers -
merge
visible and raise as gif.
I hope,
You've enjoyed my lesson and might my lesson correspond to
others than is this coincidence and it wasn't certainly not my
intention.
Nothing
from this lesson may become copied without my permission.
|